Saturday, February 6, 2010

Oven baked corn-on-the-cob


4 ears of fresh corn (I prefer silver queen or silver king when available)shucked and cleaned
2 Tablespoons butter
Seasoned Salt
Pepper
Chili flakes

1. Preheat oven to 425F

2. Season corn to taste

3. Wrap each ear individually in aluminum foil, with butter in each foil wrapper.
4. Place ears directly on oven racks (place a broiling pan on the rack below if to prevent butter from dripping, if necessary). Bake for 30-45 minutes. 

Serve with butter. 

Indoor BBQ Chicken Tenders


Package of boneless, skinless, chicken tenders
Your favorite BBQ sauce (I find the Sweet Baby Ray's brand works best, and it's GF!)
Sea Salt
Fresh-cracked pepper
Red Chili Flakes

1. Sear your chicken tenders in a pan over medium-high heat, seasoning each side as they cook. Don't forget on the chili flakes! (They really make a difference and, if you haven't noticed by now, chili flakes are my "secret ingredient" in many dishes!)
2. Once the chicken tenders are completely cooked add the BBQ sauce. Be sure to really spread the sauce around on each side of your chicken tenders. (The BBQ sauce should caramelize and become sticky, so I would not recommend using a cast-iron skillet for this!) 

Green Beans Almondine

 My Mimi makes the BEST green beans almondine EVER. 
This is my version. 


1 lb. Green Beans, washed with ends trimmed
2 Tbsp. butter
2 Tbsp. raw almond slices
1 squeeze of fresh lemon juice (approx 1 tsp.)
Lemon zest

1. Boil Green beans until they are tender

2. Melt butter in a pan over low heat; add almonds, tossing them in butter until toasted

3. Remove the butter and almonds from heat, toss green beans in butter and almonds

4. Place green beans on the dish you will be using for serving, making sure to pour any excess butter over the green beans. 
5. Toss green beans with lemon juice and zest. 

Citrus Water

Since I've been pregnant, I have been INCREDIBLY thirsty, constantly. I stay hydrated, but sometimes I believe that I am just craving something cool to chug. 

So I make citrus water as an occasional switch from just ice water or juice. 
 

It's as easy as it looks. 
 Ice water
Lemons
Limes 
 (and if you're like me, and like salty Thai lemonade
Fleur de Sal to taste
(Just a pinch, it's such a treat)

Drink up. 
(The Hungry Hubby likes it after workouts!)
 

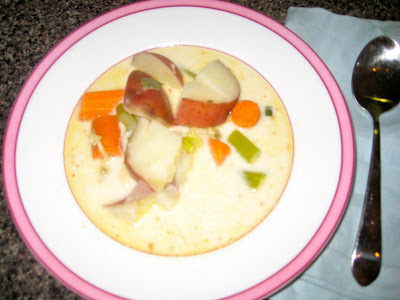
Toss-it-in-the-pot Clam Chowder

I'm going to be honest. The Hungry Hubby is not a soup-eater. Frankly, I can't even get him to try most stews beyond the meat and potatoes. Chili, he will eat; soup, to him, is to be reserved only for times of sickness (and then it is to be "Chicken-and-Stars"). 
Well, The Hungry Hubby is not joining us for lunch today. 
He has to work. 

So soup it is! (CHOWDA!!)


I love Clam Chowder. Although I was born and raised below the Mason-Dixon line, my Mother is from a well-established family from New England; because of this heritage I have come to love and cook New England favorites such as this chowder. 

I frequently make chowder to meet my tastes, changing as I go. Today's chowder includes: 
 

Red Potatoes
Celery
Carrots
Green Onions
2 Cans of whole baby clams
1 Bottle of Clam Juice
4 Cloves of Garlic, chopped
1 Shallot, chopped
4 Tablespoons Butter
Pepper, Sea Salt and Red Chili Flakes, to taste
1 1/2 Cups of Heavy Cream mixed with 1/2 cup 2% milk


1. Over medium heat, add garlic, shallot and red potatoes (cut into chunks) to a large pot with the butter. 

2. Add enough water to the pot to cover the potatoes. 
3. Once the water is heated through, add the chop carrots and the whole bottle of clam juice to the soup.
 

4. After simmering for about 5 minutes, add the celery and season with the salt (you want it to be salty to bring out the clam flavor), pepper, and chili flakes.

5. While the pot is on a good simmer, after the potatoes are soft enough for a fork to go through easily, chop the green onions. Add the chopped green onions and the two cans of clams to the mix. (Do NOT drain the clams, EVERYTHING goes into the pot!)
6. Bring the chowder to a boil, stirring occasionally.  


7. Once the chowder has boiled for a few minutes, turn down the heat and SLOWLY stir-in the cream/milk mix. (If you add the cream to fast while the pot is boiling, you risk having the cream "turn funny".)

8. Allow the chowder to simmer over medium heat for 15-25 minutes; at least until until the carrots and celery are soft enough to eat. Taste the chowder and add seasoning as needed. 


Serve on it's own, or with some crusty grilled bread and butter. (I'm hoping I can eventually give you a GF "crusty bread" tutorial soon -- but I'm still working on it!)

So, The Hungry Hubby may be missing out on this meal, but my Hungry Mimi came by and had TWO big bowls!

P.S.: This chowder will last (covered) in the 'fridge for several days. I have been known to personally polish-off an entire pot of chowder over the course of several days...it heats up well!

 

Friday, February 5, 2010

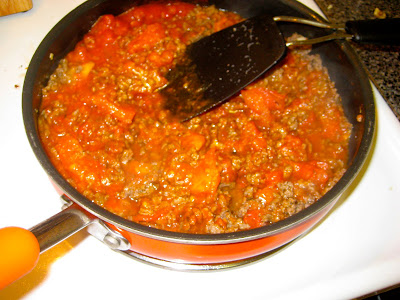
Easy "fancy" pasta sauce

So tonight, The Hungry Hubby wanted "just plain pasta and sauce". However, "plain sauce" has never really appealed to me. It makes me think of that old Prego vs. Ragu commercial-- watery pasta sauce = yuck. 
So, I made pasta and sauce, but we compromised and I jazzed it up a bit. Otherwise, it's like I'm cheating if a meal is not at least somewhat-homemade. 

For this sauce, I used the following ingredients:
 

If you can't tell from the picture, the spices I grabbed were red pepper flakes, basil, parsley, thyme, sea salt and black pepper. I also had GF spagehetti, leftover sauce from another meal, ground chuck, vine tomatoes, EVOO, garlic and some parm shreds. 

1. While boiling the water for the pasta, go ahead and heat up some EVOO in a pan, and brown a couple cloves of (chopped or crushed) garlic. 


2. Add the beef and brown it, seasoning to taste. When the meat is brown, roughly chop your tomatoes and add them to the mix. Stir once in a while, until the tomatoes look stewed, but before they get mushy. 


3. Add the pasta sauce and heat through. 
 

4. When the pasta is done, drain it and toss it with the sauce.


5. Serve topped with your shredded parm. 


P.S.: The Hungry Hubby loved the sauce, but picked out all the tomato bits, for fear that they were "slimy" (they're not). I love him, but he can be (ironically) a bit of a finicky eater. 

Anyone else have that problem?

Fluffer-Nutter GF Brownies

Thanks to the all the new Gluten-Free mixes on the market(i.e. available in regular supermarkets), I can once again (after almost 4 years) make all the fun and quick brownie variations that I used to! 

For "fluffer-nutter" GF brownies you will need:
Betty Crocker GF Brownie Mix
1/2 stick of butter
2 eggs (we use organic)
Jet-Puffed Marshmallow Creme (at least 6 tablespoons)
Peter Pan (or your favorite brand) Creamy Peanut Butter (at least 6 tablespoons) 


1. Heat the oven to 350F for a shiny metal pan or 325F for dark or nonstick pan. Grease or spray the bottom AND SIDES of the pan. 


2. Stir together the brownie mix, butter and eggs in a medium bowl (I prefer to use my Kitchen Aid stand mixer because the mix gets very thick). When the ingredients are well mixed (it will be thick) spread the brownie batter out in your pan. 


3. Alternate heaping spoonfuls of peanut butter and marshmallow fluff on top of the brownies. 


4. Take a sharp knife and use it to "marble" the batter with the peanut butter and marshmallow creme. Make sure to spread both evenly (you don't want to cut brownies that are only PB or only fluff after you've finished baking!), however, don't over-do the marbling. 
 
 
5. Bake for the recommended time on the box, (I use a 11"x7" le cruset pan, and it usually takes a bit longer to bake than the recommended 23-26 minutes) or until a toothpick inserted 2 inches from the side of the pan comes out almost clean. 

6. Serve these fluffer-nutter brownies warm, with a big glass of milk or over ice cream. In the words of The Hungry Hubby "om nom nom brownies!"


Hot sandwiches for a cold, gross day

The Hungry Hubby ended up getting the day off today, so when I got home from classes (and a spent-too-much-because-I-was-hungry grocery run) I made us some yummy, ewwy-gooey hot sandwiches to help up shake off the chill and drizzle of the day...

Here are the ingredients (I made a "normal" sammy for Hungry Hubby and a gluten-free sammy for my Celiac self, that's why two loaves of bread): 


Next step was to toast the gluten-free "tapioca loaf" slices because most GF breads taste HORRIBLE if left untoasted: 


While my bread was toasting, I assembled Hungry Hubby's sammies ("TWO please" he says!). Each sandwich had both colby jack and white sharp chedder cheese, turkey and ham, tomatoes, dijon mustard, and mayo.


Followed by a quick cheese melting/grilling on our trusty Cuisinart Griddler...

 ... these delicious lunches were ready to go! Thumbs up all around! 
The Hungry Hubby commented that these were much better than "just plain 'ole grilled cheese"

Blueberry Love Muffins

This morning I made the Hungry Hubby some "Blueberry Love Muffins" in honor of Valentine's Day. He was very excited to have a "just for him" treat, as these are your basic Betty Crocker full-of-gluten muffins. But look at these cute cupcake papers I got for Valentine's Day!


To serve, I cut several in half and toasted them in the oven with some butter and sugar on top. The result was a crusty, amazing-smelling breakfast for a very happy man! 


Yummy huh?